Loaded No-Churn Monster Cookie Ice Cream recipe
This Loaded No-Churn Monster Cookie Ice Cream is a fun, easy dessert you can make without any stress.It comes together with simple ingredients and no ice cream maker needed.
Servings: cups
Equipment
- 1 Electric mixer
- 1 big mixing bowl
- 1 freezer-safe container
Ingredients
- 2 cups heavy whipping cream very cold
- 14 ounces sweetened condensed milk 1 can
- 1 teaspoon vanilla extract
- 1/2 teaspoon salt
- 2-4 drops Blue gel food coloring start small, adjust
- 1 cup crushed chocolate sandwich oreos cookies in chunks not crumbs
- 1 1/2 cup chopped chocolate chip cookies in medium and big chunks
- 1/2 cup mini chocolate chips
Instructions
- Pour the cold heavy whipping cream into a large mixing bowl. Using a hand mixer or stand mixer, beat on medium-high speed for about 2 to 3 minutes, until soft peaks form. You’ll know it’s ready when you lift the beaters and the cream holds its shape but the tip gently folds over.2 cups heavy whipping cream
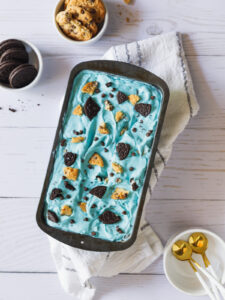
- In the same bowl, add the sweetened condensed milk, vanilla extract, salt, and 2 drops of blue gel food coloring. Mix on low speed just until combined. Check the color, then add 1 to 2 more drops if needed until you get a bright Cookie Monster blue. Mix just until evenly colored.14 ounces sweetened condensed milk, 1 teaspoon vanilla extract, 1/2 teaspoon salt, 2-4 drops Blue gel food coloring
- Add the crushed Oreos, chopped chocolate chip cookies, and mini chocolate chips. Use a spatula to gently fold everything in until evenly distributed. Do not use the mixer for this step so the cookies stay chunky.1 cup crushed chocolate sandwich oreos cookies , 1/2 cup mini chocolate chips, 1 1/2 cup chopped chocolate chip cookies
- Transfer the mixture into a loaf pan or freezer-safe airtight container. Smooth the top with a spatula. For extra protection against ice crystals, press a piece of plastic wrap directly onto the surface before covering.
- Freeze for at least 6 hours for scoopable ice cream. If you want a softer, creamier texture, check it at 4 hours. Let it sit at room temperature for 5 minutes before scooping if it’s too firm.
Notes
Expert Tips
A few small details will help you get the best creamy ice cream every time.- Use gel food coloring instead of liquid so the ice cream base stays thick and smooth. I used a natural food dye.
- Stop whipping once you reach soft peaks to keep the texture light and avoid a grainy finish
- Fold in the chopped cookies gently to keep the ice cream mixture airy and evenly mixed
- Keep cookie pieces slightly larger so you get texture in every bite
- Let the ice cream sit for a few minutes before scooping for a smoother, cleaner ice cream scoop
Frequently Asked Questions
Do I need an ice cream maker?
No. This is a no-churn ice cream recipe, so you don’t need an ice cream maker or ice cream machine.Why is it blue?
The color comes from blue food coloring and is inspired by Cookie Monster from Sesame Street.Can I use different cookies?
Yes. You can use any favorite cookies. Mixing different types changes the ice cream flavor and texture.How do I store homemade ice cream?
Store your homemade ice cream in airtight ice cream containers in the freezer to keep the texture smooth.Can I make this recipe ahead of time?
Yes. This is a great make-ahead dessert. Prepare it the day before and freeze until ready to serve.Can I freeze it longer?
Yes. It will keep well for up to 2 weeks. After that, the texture may change slightly, but it’s still fine to eat.How long does it last?
Store in an airtight container in the freezer for up to 2 weeks for the best texture and flavor.