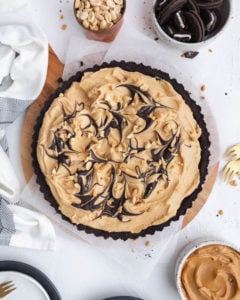
Easy No-bake Peanut Butter Tart
Super easy, No-bake tart, with a creamy Peanut Butter filling, a crunchy chocolate cookie crust and chocolate swirls to top
Servings: servings
Ingredients
Crust:
- 28 cookies OREO including the filling
- 4 Tablespoons unsalted butter melted
- 50 grams semi-sweet chocolate melted
- 1/2 teaspoon sea salt
Chocolate Topping:
- 30 grams semi-sweet chocolate
- 1/2 teaspoon unsalted butter
Peanut Butter Filling
- 1 8 ounce full fat cream cheese at room temperature
- 1 1/4 Cup creamy peanut butter
- 3/4 Cup powdered sugar
- 2 teaspoons vanilla extract
- 1/2 teaspoon salt
- 3/4 Cup heavy whipping cream chilled
Garnish:
- 1/4 cup Peanuts unsalted
Instructions
- In a food processor, pulse all crust ingredients until they reach a sandy consistency. Press the mixture firmly into the bottom and sides of a 10” tart pan and refrigerate.28 cookies OREO, 4 Tablespoons unsalted butter, 50 grams semi-sweet chocolate, 1/2 teaspoon (0.5 teaspoon) sea salt
- Melt the butter and chocolate together for the garnish, then set it aside to let it cool while preparing the filling.30 grams semi-sweet chocolate, 1/2 teaspoon (0.5 teaspoon) unsalted butter
- Beat the cream cheese on medium-high speed for about 1 minute until smooth. Add the peanut butter and beat until fully combined. Then, add the powdered sugar, vanilla extract, and salt, and continue beating until everything is well mixed.1 8 ounce full fat cream cheese, 1 1/4 Cup (322.5 g) creamy peanut butter, 3/4 Cup (90 g) powdered sugar, 2 teaspoons vanilla extract, 1/2 teaspoon (0.5 teaspoon) salt
- In a separate bowl, whip the heavy cream until stiff peaks form. Gently fold the whipped cream into the peanut butter mixture until fully combined. Scoop the mixture into the prepared crust.3/4 Cup (177.4 ml) heavy whipping cream
- Dollop the melted chocolate mixture over the tart and swirl with a toothpick or butter knife. Sprinkle with peanuts and refrigerate for at least 1 hour before serving.1/4 cup (36.5 g) Peanuts
- To remove the tart from the pan, place the pan over a can or something similar to elevate it. Remove the rim of the pan, then run a knife around the edge below the tart. Carefully slide the tart off the base and transfer it to a serving plate.
Notes
Add Ons and Substitutions for this No-Bake Chocolate Peanut Butter tart
Add-Ons:
- Chopped Reese's Cups or Mini Peanut Butter Cups: Layer these on top for a fun, candy-like element.
- Sea Salt Flakes: Sprinkle on top for a gourmet look and a salty-sweet contrast.
- Whipped Cream Swirls: Pipe around the edges for added elegance and creaminess.
- Crushed Pretzels: Scatter over the top for a salty crunch that complements the peanut butter.
- Marshmallow Fluff: Add a thin layer between the crust and filling for a s'mores-like vibe.
Substitutions:
- Chocolate Sandwich Cookies: Swap with graham crackers, digestive biscuits, or peanut butter cookies for a different crust flavor.
- Semi-Sweet Chocolate: Replace with dark chocolate for a richer taste or milk chocolate for a sweeter option.
- Full-Fat Cream Cheese: Substitute with mascarpone for a milder flavor or use dairy-free cream cheese for a vegan version.
- Creamy Peanut Butter: Try almond butter, cashew butter, or sunflower seed butter for a unique twist.
- Peanuts: Use chopped almonds, pecans, or pretzels for a crunchy topping alternative.
Expert Tips
- Bring the cream cheese to room temperature before using it to ensure a smooth, lump-free filling. Let it sit out for about 45 minutes before starting.
- Allow the chocolate topping to cool completely before swirling it onto the tart. Adding it while warm can melt or disrupt the filling.
- Ensure the tart is fully chilled before removing it from the tart pan. This helps the chocolate crust hold its shape and prevents cracking.
- When incorporating the whipped cream into the peanut butter filling, gently fold it in using a spatula instead of an electric mixer. This technique preserves the whipped cream’s airy texture, giving the filling a light, fluffy consistency.
- For extra ease when removing the tart from the pan, briefly run a warm, damp cloth around the outside of the pan to loosen the crust slightly.
- To achieve clean slices, use a sharp knife warmed under hot water, then wipe it clean between cuts.
- Refrigerate the tart for at least 4 hours or overnight for the best texture and flavor development.
Nutrition
Serving: 1g | Calories: 509kcal | Carbohydrates: 40g | Protein: 11g | Fat: 37g | Saturated Fat: 13g | Polyunsaturated Fat: 17g | Cholesterol: 30mg | Sodium: 423mg | Fiber: 4g | Sugar: 24g
