Easy No-Bake Peanut Butter Tart Recipe
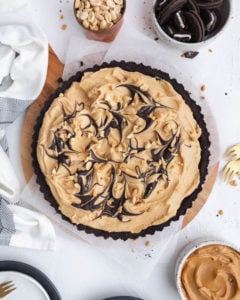
This super easy No-bake Peanut Butter tart, has a creamy Peanut Butter filling made out of only 5 ingredients, a crunchy chocolate cookie crust with an intense chocolate flavor, and to top, chocolate swirls and peanuts.

Chocolate and Peanut butter, Peanut Butter and Chocolate, they’re just so good together! It’s one of those flavor combos that are a perfect match, made into a simple and so amazingly delicious tart.
The filling is made with cream cheese, which -along with the peanut butter- makes it super creamy and soft, and the crust is made with chocolate cookies and the addition of melted chocolate gives it an intense chocolate flavor.

Ingredients for this Easy No-bake Peanut Butter Tart
This recipe calls for simple ingredients, found in any grocery store:
- Chocolate Sandwich Cookies: These form the base of the tart. The crushed cookies provide structure and a rich chocolate flavor that pairs beautifully with the creamy peanut butter filling.
- Semi-Sweet Chocolate: Melted and combined with the cookie crumbs, this adds depth to the crust and helps it hold together while also enhancing the chocolate flavor.
- Unsalted Butter: Acts as a binder for the crust, holding the crushed cookies and melted chocolate together. It also adds a luscious, buttery richness.
- Sea Salt: A small pinch balances the sweetness in the crust and filling, creating a more complex and satisfying flavor profile.
- Full-Fat Cream Cheese: The base of the filling, provides creaminess, tanginess, and a sturdy texture to support the peanut butter. It also helps the tart set properly.
- Creamy Peanut Butter: The star ingredient in the filling. It gives the tart its signature nutty flavor and creamy texture.
- Powdered Sugar: Sweetens the filling while maintaining a smooth consistency. Its fine texture ensures there’s no grittiness in the tart.
- Vanilla Extract: Enhances the flavors of the peanut butter and cream cheese with a warm, subtle sweetness.
- Heavy Whipping Cream: Whipped and folded into the filling, it adds lightness and a silky texture to balance the richness of the peanut butter and cream cheese.
- Peanuts: Used as a topping for crunch and to highlight the peanut butter flavor. They also provide a nice contrast in texture to the creamy filling and smooth crust.
Take a look at the recipe card at the bottom of this post for the full recipe.
Add Ons and Substitutions for this No-Bake Chocolate Peanut Butter tart
Add-Ons:
- Chopped Reese’s Cups or Mini Peanut Butter Cups: Layer these on top for a fun, candy-like element.
- Sea Salt Flakes: Sprinkle flaky sea salt on top for a gourmet look and a salty-sweet contrast.
- Whipped Cream Swirls: Pipe around the edges for added elegance and creaminess.
- Crushed Pretzels: Scatter over the top for a salty crunch that complements the peanut butter.
- Marshmallow Fluff: Add a thin layer between the crust and filling for a s’mores-like vibe.
Substitutions:
- Peanuts: Use chopped almonds, pecans, or pretzels for a crunchy topping alternative.
- Chocolate Sandwich Cookies: Swap with graham crackers, digestive biscuits, or peanut butter cookies for a different crust flavor.
- Semi-Sweet Chocolate: Replace with dark chocolate for a richer taste or milk chocolate for a sweeter option.
- Full-Fat Cream Cheese: Substitute with mascarpone for a milder flavor or use dairy-free cream cheese for a vegan version.
- Creamy Peanut Butter: Try almond butter, cashew butter, or sunflower seed butter for a unique twist.
How to make this No-Bake Dessert Recipe
In a food processor, pulse all crust ingredients until they reach fine crumbs. Press the oreo crumbs firmly into the bottom and sides of a 10” removable bottom tart pan and refrigerate.
In a small bowl, mix melted butter and chocolate together for the garnish, then set it aside to let it cool while preparing the filling.
In a large bowl of a stand mixer, beat the cream cheese on medium-high speed for about 1 minute until smooth. Add the peanut butter and beat until fully combined. Then, add the powdered sugar, vanilla extract, and salt, and continue beating until everything is well mixed.

In a separate bowl, whip the heavy cream until stiff peaks form. Gently fold the whipped cream into the peanut butter mixture until fully combined. Scoop the mixture into the prepared crust.
Dollop the silky chocolate ganache mixture over the tart and swirl with a toothpick or butter knife. Sprinkle with peanuts and refrigerate for at least 1 hour before serving.
To remove the tart crust from the pan, place the pan over a can or something similar to elevate it. Remove the rim of the pan, then run a knife around the edge below the tart. Carefully slide the tart off the base and transfer it to a serving plate.
Expert Tips
- Bring the cream cheese to room temperature before using it to ensure a smooth, lump-free filling. Let it sit out for about 45 minutes before starting.
- Allow the chocolate topping to cool completely before swirling it onto the tart. Adding it while warm can melt or disrupt the filling.
- Ensure the tart is fully chilled before removing it from the tart pan. This helps the chocolate crust hold its shape and prevents cracking.
- When incorporating the whipped cream into the peanut butter filling, gently fold it in using a spatula instead of an electric mixer. This technique preserves the whipped cream’s airy texture, giving the filling a light, fluffy consistency.
- For extra ease when removing the tart from the pan, briefly run a warm, damp cloth around the outside of the pan to loosen the crust slightly.
- To achieve clean slices, use a sharp knife warmed under hot water, then wipe it clean between cuts.
- Refrigerate the tart for at least 4 hours or overnight for the best texture and flavor development.
Frequently Asked Questions
Can I make this tart ahead of time?
Yes! This tart can be made a day or two in advance. Just store it in the refrigerator until you’re ready to serve.
Can I substitute the cream cheese?
Yes, you can use a dairy-free cream cheese alternative if needed.
Is it possible to make a gluten-free crust?
Absolutely! You can swap the chocolate sandwich cookies for gluten-free chocolate cookies or even gluten-free graham crackers for the crust.
Can I use a different nut butter instead of peanut butter?
Yes, you can substitute peanut butter with almond butter, cashew butter, or sunflower seed butter for a different flavor.
How do I store any leftovers?
Store any leftover tart in an airtight container in the refrigerator for up to 3 days. It can also be frozen for up to 1 month.
Can I make this without the chocolate topping?
Yes, the tart is still delicious without the chocolate topping. If you prefer, you can top it with extra peanuts or a different garnish.
Here’s a how-to video for visual instructions on how to make this tart
Take a look at the links below for more Tart and Pie recipes:
If you make this recipe, please be sure to give it a rating and leave a comment below!


Delicious!