Delicious & Easy Raspberry Tart Recipe
This delicious & easy Raspberry Tart Recipe is the perfect mix of simplicity and elegance, featuring a crisp, buttery crust and a vibrant raspberry topping.
It’s simple enough for beginners but impressive enough for a special occasion or dinner party. With minimal effort, you’ll create a bakery-worthy dessert full of flavor and texture.
If you’ve never made a tart shell before, don’t worry! This easy raspberry tart comes together quickly with a shortbread crust that requires no rolling pin. The filling is as simple as spreading raspberry preserves and arranging fresh berries on top. Let’s get started!
Baking with Raspberries
- Choose ripe but firm berries – You want raspberries that are fully ripe for the best flavor, but not overly soft or mushy, which can fall apart.
- Wash and dry thoroughly – Always rinse raspberries gently right before using them, and make sure they’re completely dry. Wet berries can add excess moisture to your filling, which can affect the texture.
- Add them gently – Raspberries are delicate, so when arranging them on top of a dessert, do it gently to avoid crushing them.
Ingredients
This recipe calls for simple ingredients, found in any grocery store. Each component plays a key role in making the tart shell crisp, the filling rich, and the fresh fruit shine.
- Unsalted butter: Creates a tender, melt-in-your-mouth shortbread crust.
- Powdered sugar: Sweetens the crust and gives it a fine, smooth texture.
- Vanilla extract: Adds depth to the flavor of the tart crust.
- Salt: Enhances the flavor and balances the sweetness.
- All-purpose flour: The base of the pastry dough, giving structure to the tart shell.
- Raspberry preserves: Provides a sweet, jammy layer that holds the fresh berries in place.
- Fresh raspberries: The star of the tart! Their bright, tart flavor balances the richness of the crust.
Take a look at the bottom of this post for the full recipe.

Add-ons & Substitutions
- Whipped Cream or Vanilla Ice Cream: Make your own whipped cream using heavy cream, or use vanilla ice cream to serve with the tart and balance out the tartness of the raspberry fruit.
- Chocolate raspberry tart: Spread a thin layer of melted chocolate on the baked crust before adding the preserves.
- Mini raspberry tarts: Divide the dough into mini pie shells for individual servings.
- Pâte sucrée: Swap the shortbread crust for a classic French tart dough for a more traditional take.
- Raspberry curd: Instead of preserves, use a homemade raspberry curd for extra fruitiness.
How to Make An Easy Raspberry Tart
Preheat your oven to 350°F (175°C) and lightly grease the bottom and sides of a 10-inch tart pan with a removable bottom. This will help the tart come out easily after baking.
In the bowl of a stand mixer (or using a handheld mixer and a large bowl), beat the unsalted butter and granulated sugar together on medium speed for about 2 minutes, or until the mixture looks light and fluffy. This step helps create a tender crust.
Add the vanilla extract and salt, then mix again until just combined. Make sure to scrape down the sides and bottom of the bowl with a rubber spatula to ensure everything is well mixed.


Next, add the flour and mix at a low speed to prevent it from flying out of the bowl. Once it begins to come together, increase the speed to medium and mix just until the dough forms large, crumbly clumps. Be careful not to over-mix — you don’t want a smooth dough, just clumps that hold together when pressed.
Transfer the dough to your prepared tart pan. Use your fingers or the bottom of a measuring cup to press the dough evenly into the bottom and up the sides of the pan, making sure it’s packed in well and evenly distributed.


Bake crust for 15–20 minutes, or until it turns a light golden brown. Remove from the oven and let it cool completely in the pan before adding the filling.
Once the crust is fully cooled, spoon the raspberry preserves onto the crust and spread them out evenly with the back of a spoon or an offset spatula.
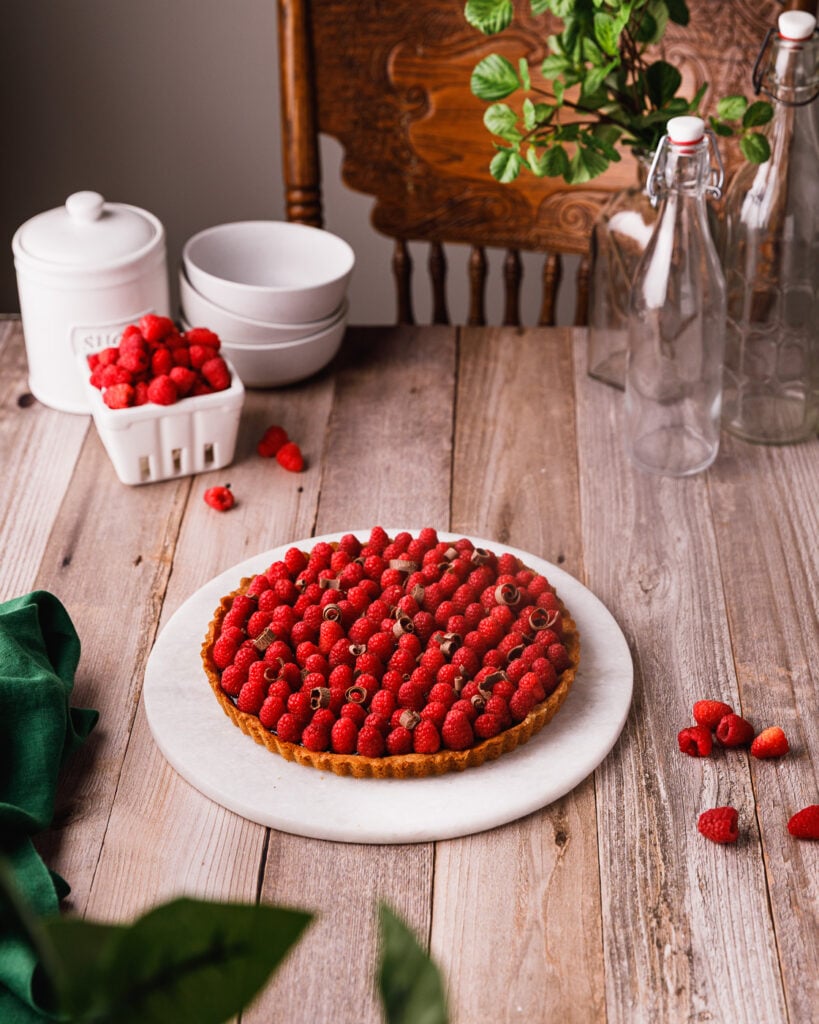
Arrange the fresh raspberries on top, placing them stem-side down in concentric circles or any pattern you like.
If you’d like, serve each slice with a dollop of whipped cream or a scoop of vanilla ice cream for an extra treat!
Expert Tips for this fresh Raspberry Tart
- For a crisp crust, let the tart shell cool completely before adding preserves.
- Use a fine mesh sieve to dust powdered sugar over the finished tart for a beautiful touch.
- Chill the tart for 10-12 minutes before serving to help the layers set.
- Using high-quality preserves elevates the flavor, so it’s worth choosing a good brand if you can.
- Divide the dough into mini tart pans instead for mini tarts
- There’s no need to use pie weights for this shortbread cookie crust!

Frequently Asked Questions
What makes a tart different from a pie?
A tart has a firm, structured crust and is usually open-faced, while a pie has a softer crust and often a top layer of pastry.
Can I use a pie dish instead of a tart pan?
Yes, but a tart pan with a removable bottom makes it easier to remove and serve clean slices.
How should I store leftovers?
Store the tart in an airtight container in the fridge for up to 3 days.
Can I make this tart ahead of time?
Yes! Bake the tart shell in advance and store it at room temperature in plastic wrap for up to 5 days. Assemble with preserves and berries before serving.
Can I freeze this tart?
The tart shell can be frozen for up to 3 months. Make sure to thaw it completely and assemble before serving.
Do I need to use lemon juice to keep the raspberries fresh?
No, fresh raspberries in their full form do not oxidize quickly like cut apples
Follow this link for more Pies & Tarts recipes, and take a look at the links below to see some similar recipes:


Make sure to tag #sweetfixbaker on Instagram to see your amazing creations!
If you make this recipe, please be sure to give it a rating and leave a comment below!

Delicious & Easy Raspberry Tart Recipe
Equipment
- 1 Electric mixer
- 1 10 inch tart pan with removable rim
Ingredients
- 1/2 cup unsalted butter room temperature
- 1/2 cup powdered sugar measured with the spoon and level method
- 1 teaspoon pure vanilla extract
- 1/4 teaspoon salt
- 1 cup all-purpose flour measured with the spoon and level method
- 3/4 cups raspberry preserves
- 3 cups fresh raspberries washed and dried
Instructions
- Preheat your oven to 350°F (175°C) and lightly grease the bottom and sides of a 10-inch tart pan with a removable bottom. This will help the tart come out easily after baking.
- In the bowl of a stand mixer (or using a handheld mixer and a large bowl), beat the unsalted butter and powdered sugar together on medium speed for about 2 minutes, or until the mixture looks light and fluffy. This step helps create a tender crust.1/2 cup unsalted butter, 1/2 cup powdered sugar
- Add the vanilla extract and salt, then mix again until just combined. Make sure to scrape down the sides and bottom of the bowl with a rubber spatula to ensure everything is well mixed.1 teaspoon pure vanilla extract, 1/4 teaspoon salt
- Next, add the flour and start mixing at a low speed to prevent it from flying out of the bowl. Once it begins to come together, increase the speed to medium and mix just until the dough forms large, crumbly clumps. Be careful not to over-mix — you don’t want a smooth dough, just clumps that hold together when pressed.1 cup all-purpose flour
- Transfer the dough to your prepared tart pan. Use your fingers or the bottom of a measuring cup to press the dough evenly into the bottom and up the sides of the pan, making sure it's packed in well and evenly distributed.
- Bake crust for 15–20 minutes, or until it turns a light golden brown. Remove from the oven and let it cool completely in the pan before adding the filling.
- Once the crust is fully cooled, spoon the raspberry preserves onto the crust and spread them out evenly with the back of a spoon or an offset spatula.3/4 cups raspberry preserves
- Arrange the fresh raspberries on top, placing them stem-side down in concentric circles or any pattern you like.3 cups fresh raspberries
- If you’d like, decorate with chocolate curls and serve each slice with a dollop of whipped cream or a scoop of vanilla ice cream.
Notes
Add-ons & Substitutions
- Whipped Cream or Vanilla Ice Cream: Make your own whipped cream using heavy cream, or use vanilla ice cream to serve with the tart and balance out the tartness of the raspberry fruit.
- Chocolate raspberry tart: Spread a thin layer of melted chocolate on the baked crust before adding the preserves.
- Mini raspberry tarts: Divide the dough into mini pie shells for individual servings.
- Pâte sucrée: Swap the shortbread crust for a classic French tart dough for a more traditional take.
- Raspberry curd: Instead of preserves, use a homemade raspberry curd for extra fruitiness.
Expert Tips for this fresh Raspberry Tart
- For a crisp crust, let the tart shell cool completely before adding preserves.
- Use a fine mesh sieve to dust powdered sugar over the finished tart for a beautiful touch.
- Chill the tart for 10-12 minutes before serving to help the layers set.
-
Using high-quality preserves really elevates the flavor, so it’s worth choosing a good brand if you can.
-
Divide the dough into mini tart pans instead for mini tarts
-
There’s no need to use pie weights for this shortbread cookie crust!


